Don vs. Electronics: This Time It's Personal (and Educational)

---

I've been working on putting together a soldered version of the elevator project I recently completed (to my own satisfaction, that is) using breadboards.

I spent quite a while drawing the circuit, resulting in the following diagram. I used the Fritzing program to draw this. It gives you a blank circuit area to work with, and you can put breadboards into the drawing space and wire your components together.


From there, I drew up a circuit diagram on graph paper, and tried to identify the inputs, outputs, and location of the chips. I wanted to have some ribbon cables connecting the Arduino to the circuit board.

Unfortunately, I didn't lay things out very well - I had one of the ribbons going to two different places, and the connectors I bought don't "stick" into the ports on the Arduino - they just fall out. I'll have to do some more investigation into the right kind of connectors before I can continue.

Here are a few pictures of the board - it's super ugly, but these things often are. It's the first one I've done from scratch, so I may be able to improve on it if I go another round with the soldering iron.


Some notes - the circuit diagram and a mock layout on graph paper. The mock layout looked good on paper, as they say, but it didn't work out when I was ready to connect the ribbon cables to the board. Oops!


The beginnings of the board. I have soldered a few components in place, and am in the process of drilling the holes for the buttons.


Same as before, but with the ribbon cables that I want to use to connect the board to the Arduino and power supplies.


The front of the board, with the chips in their sockets and the wires snaking around however I could make them fit. Presumably, there would be a cover over this board so you could only see the buttons and LED display, although on further inspection, most of the other components, and some wires, were almost as tall as those components.


The back of the board, where the ugly happens. The red wire is the positive "bus", and you'll note a few places the insulation was scraped off the wire so I could hook a component directly to it. This, and many other tricks I tried, were found on the internet by other people who can do this and make it look pretty. The black wire, and the associated blobs of solder that form solid lines, is the ground "bus". There are quite a few places in the wiring where components are wired to one or both of the positive/negative buses that I felt it was necessary to run those wires all over the place. The bottoms of the buttons, and some of the chip connections to the buses, were made with leads clipped off of spare components.

I've learned a ton from this experience. My first diagram had the wires on the right side of the LED display one space lower than they should have been, and I had all but the final wire soldered before I realized it. Lots of lessons learned, and my soldering skills are better now, too.

Now - back to researching circuits some more, and then to find some better header connectors to replace the ones I bought. Eventually, I'd like to make one of these:


I don't actually want to make one of these. Just kidding. Dad, recognize this?

---

Piano-palooza

---


M playing one of his award-winning Solo and Ensemble pieces: "Prelude Number 10 in Eb Major", by Robert Vandall.


K playing MacDowell's "At an Old Trysting Place"

---

M at Solo & Ensemble: Before and After

---

M performed at his first Solo & Ensemble this morning. He played two short pieces by Robert Vandall on piano.

He did a great job, playing in a small room with three strangers watching him: the judge, a person helping the judge, and a woman who, right before we entered the room, announced that she was also going to watch. The unidentified woman, who I am guessing is a piano teacher, sat at a chair literally an arm's length from M while he played. I was also in the room - I asked M if he wanted me there or not, and he told me it didn't matter. Cool as a cucumber, he.

Here are some before and after pictures of M at the venue, Livonia's Franklin High School:


Before, his shirt devoid of decoration.


After, with his blue medal!

Congratulations, M! Well done, sir!

P.S. Did I mention yesterday was M's 13th birthday?

-----


Drawing Class

---

I took a drawing class during the fall session of Adult Ed last year. I posted a few of my prior drawings in this post.

During the last few weeks of the class, the teacher showed us how to copy and enlarge a photo by using the "grid" method. You draw 1" boxes on a photo, then draw larger boxes on a larger piece of paper (in my case, 2" boxes), and draw the outline of the objects in the photo so the figures and shapes are proportional to the lines/boxes of the original.

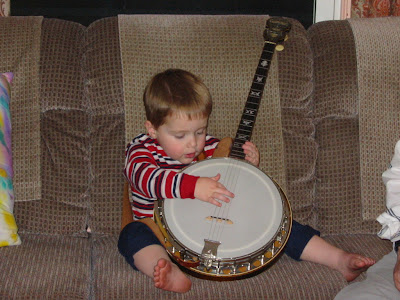
I started with this photo of M playing his Grandpa's banjo:


I printed a black-and-white copy of the photo, and drew boxes with 1" sides.


I don't have a picture of the boxes I drew for the larger version, but I do have a picture of the complete drawing, which I finished this morning.


Meet the New Year, Same as the Old Year

---
Make Way for the Olympians

I’ve been busy with Science Olympiad lately – pretty much every night the last few weeks I’ve had something or other to do. That should end pretty soon for several weeks, and I’m looking forward to a little break.

K is starting indoor soccer (aka “futsal”). It’s soccer played in a gym with a half-size soccer ball. If it sounds like a loud sport, that’s because it is.

M is now sporting braces on his top and bottom teeth, and the orthodontist says he’ll be done this year. We’ll be paying until he’s out of high school, but can you put a price on straight teeth? Yes, you can. It's rather high.

Mesko and Rigby are doing fine. Why wouldn’t they be doing fine?

Links, Pictures, Neat Stuff
A lot of miscellaneous items today...

Some old owners manuals. I had higher hopes for this gallery than I should have, but they’re fun to look at.

I’ll take one of these.

Great picture of a red-tailed hawk.

I love this tiny house built on a rock in the middle of a river.

Owl!

I like looking at these boats. I don’t have a good reason, I just like them.

M and I are going to do this for his locker. The problem is the LED light strips the person suggests are really expensive. I’m sure we can modify this plan to make something bright enough to help him see his books, but that will still run on a battery.

Looking for a project? Try this site.

Merry Christmas from Henry Ford Museum

---

We made an early-morning visit to Henry Ford Museum yesterday, one of my favorite places. They've done some decorating for Christmas, it's really nice to go there this time of year.

The special exhibit was a display of iconic architectural structures, made with LEGOs. There was Ford Field (still under construction), Willis (Sears) Tower, the really tall building in Dubai, and Frank Lloyd Wright's "Fallingwater" home.


Ford Field


Fallingwater

I love the massive power generators, and in many ways, I like the models of the power generators more than the real things. As soon as I retire, that's what I'm going to do - make some miniature power generators to power a doll house.


A scale model of a power generator


A scale model of a machine shop, with belt-powered lathes and metal-working machines. At night, tiny people come out and make souvenirs to sell in the gift shop.


This a screen snapshot from the "1800s Power Plant" iPhone app.

---

And, finally, to wish you a Merry Christmas, here are (left to right) Rigby and Mesko, who sometimes actually sleep like this.


From all of us here at The DEB Log, the journalism and editorial staff, proofreading department, photography lab, circulation department, and phone support center - Merry Christmas!

---

Links for the Holidays

I've been saving up a few links. I don't keep as many around as I used to, I've been only saving ones that really make an impression or will be fun to post. Here's my latest collection.

Candle-Powered Candle
I saw this, then I went home and pulled out a few heat sinks, a fan, and a candle. It didn't work for me. I don't have the exact parts he used, though, just something close. It makes sense that this could work: the candle heats the heat sink, the heat from the heat sink will rise, moving the air, and that will cause the fan to rotate. The rotating fan will generate electricity (like a windmill) and power the LED light.

Ginheads Rejoice
Tired of spending your hard-earned money on gin? I know I am! Putting this on your Christmas list will save you some money and you’ll end up with the gin you’ve always wanted – the homemade kind. Hawkeye and Trapper will have nothing on you.

Speaker Project - Two Will Get You Stereo
Definitely do-able. Maybe M's next project...

Gravity-Powered Light
What a great idea - a light that's powered by gravity. It appears to work on a similar principle to a grandfather clock, although more high-tech.

Instructables
If you haven't seen Instructables, it's the place to find your next project. Here's the electronics section, but there are others. Look around!