Falling for October
Fall? Yes.
Fall is definitely here. The colors on the leaves are changing, there's a chill in the air, and there are only a few weeks left in soccer season. It's getting darker a lot earlier, and we find ourselves inside under blankets, keeping warm while we slow down our day. The Halloween decorations are up, and the pumpkins are on the porch, waiting for us to carve out their guts and cut holes in their skins. Gross.
J sometimes buys little bags of candy corn and pumpkin-shaped treats and puts them in a bowl on the counter. They're not as tasty as I remember from my childhood. It could be that I just enjoyed them more as a child, but it is probably because they now make them out of recycled newspapers and milk jugs. The way we recycle everything has really changed the food industry, hasn't it? I just read that my favorite pop, Diet Mountain Dew, is made entirely of water, caffeine, and grass clippings from golf courses.
What's going on at work for me? Nothing new, still working on the new product with a combination of Silverlight, C#, and SQL Server. Stop me if you've heard this one.
J and I went to the middle school teacher conferences last week. The teachers sit at tables in the cafeteria, and parents have a few minutes to talk to the teachers about the class and their student(s). M is doing very well in his classes so far, and has fit in well. He's playing soccer, and his practices are over for the season, with one game to go.
A Few Links
Scratch-built models:
Cannon model
Corsair airplane
A cat made from typewriter parts
The Missing Link
I found a link to the website that gave me the idea to put a new handle on my pocket knife, and I was wrong - the author used wood, not bone. I must have been thinking of another site...
Knife Project
---
Several years ago, I was given the opportunity to go through some of J's grandfather's tools and take the ones I would use. I regret that I didn't take more time to think through what I would like to have, and that I did not take more than a small box's worth of tools. I'll put that day on my time travel wish list. I was fortunate to grab some very nice things, many of which I have used on one project or another, and they are a reminder of him and the wonderful work he did in his woodshop when he was alive.
One of the items I took was an old pocket knife. It has three blades, a long clip-point, a short clip-point, and a short sheepsfoot blade, which is often used for whittling. (See Wikipedia for the definitions of the blade shapes.)
One side of the knife was bone, and the other was black plastic. The bone side was crumbling, and had been cracked since I acquired it.
 This knife could use some work, although I have used it for several years, and the blades have always done their jobs.
I saw a website where someone shared his experience with removing the sides of his pocket knife and replacing them with bone. I can't find the article or I would put a link to it here. It gave me the idea to replace my knife's sides, although I didn't want to bother with bone.
I thought it would be pretty easy to make some wood replacements for the sides. I removed the material, then took out a bit of cherry and sawed, filed, sanded, and otherwise shaped the sides to fit. It was not as easy as I thought, partly because holding down such small pieces of wood was a challenge. I don't have any bench sanding tools that were appropriate for this project, so it was largely a matter of time and patience.
 Some pieces in various stages of being shaped. I made several sides before I got two I liked.
While the old sides were off, I cleaned the blades and sharpened them, using 600-1000 grit sandpaper, and then honed them on a strop. They were already pretty sharp from a prior sharpening session a few years ago, but this was a good opportunity to do it again. I have used the knife quite a bit, despite its failing appearance.
When the sides were finished, they looked a little odd - most knives have rivets to hold the side materials in place, and I didn't have any rivets or tools to insert them. The plain wood didn't look quite right.
I decided to add fake "rivets" to the sides to give them a more traditional look. I bought some brass rod at the hardware store and cut it into small pieces, then filed and sanded the pieces until they were slightly rounded at the ends and short enough to fit into the wood sides. I drilled holes in the sides using a pin vise and a small bit, then I superglued the brass into the holes. I let the glue set for a day, then superglued the sides onto the bare metal of the knife. The super glue I used was the gel kind, not the liquid kind. The gel kind will fill gaps and is more forgiving when the two mating parts are not perfect fits.
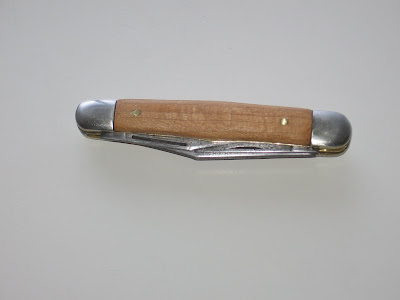
Here is the result. A successful project, and it wasn't too hard. I did make a mistake on the side you're not seeing which caused a tiny hole to appear as I was doing my final sanding and shaping. I can live with that, though, because I wasn't creating a museum piece and the knife is working very well, hole or no hole.
 Ready to go
---
Stay tuned for more tool restorations at The DEB Log. I have another tool on the bench, this one from my dad, and I hope to have it cleaned up and ready to go soon.
Also, Halloween is coming, and I've been putting some thought into my pumpkin design this year. The UM fans around the neighborhood are tired of seeing my MSU pumpkins, so I'll give them a break and move onto something different.
---

Several years ago, I was given the opportunity to go through some of J's grandfather's tools and take the ones I would use. I regret that I didn't take more time to think through what I would like to have, and that I did not take more than a small box's worth of tools. I'll put that day on my time travel wish list. I was fortunate to grab some very nice things, many of which I have used on one project or another, and they are a reminder of him and the wonderful work he did in his woodshop when he was alive.
One of the items I took was an old pocket knife. It has three blades, a long clip-point, a short clip-point, and a short sheepsfoot blade, which is often used for whittling. (See Wikipedia for the definitions of the blade shapes.)
One side of the knife was bone, and the other was black plastic. The bone side was crumbling, and had been cracked since I acquired it.

I saw a website where someone shared his experience with removing the sides of his pocket knife and replacing them with bone. I can't find the article or I would put a link to it here. It gave me the idea to replace my knife's sides, although I didn't want to bother with bone.
I thought it would be pretty easy to make some wood replacements for the sides. I removed the material, then took out a bit of cherry and sawed, filed, sanded, and otherwise shaped the sides to fit. It was not as easy as I thought, partly because holding down such small pieces of wood was a challenge. I don't have any bench sanding tools that were appropriate for this project, so it was largely a matter of time and patience.

While the old sides were off, I cleaned the blades and sharpened them, using 600-1000 grit sandpaper, and then honed them on a strop. They were already pretty sharp from a prior sharpening session a few years ago, but this was a good opportunity to do it again. I have used the knife quite a bit, despite its failing appearance.
When the sides were finished, they looked a little odd - most knives have rivets to hold the side materials in place, and I didn't have any rivets or tools to insert them. The plain wood didn't look quite right.
I decided to add fake "rivets" to the sides to give them a more traditional look. I bought some brass rod at the hardware store and cut it into small pieces, then filed and sanded the pieces until they were slightly rounded at the ends and short enough to fit into the wood sides. I drilled holes in the sides using a pin vise and a small bit, then I superglued the brass into the holes. I let the glue set for a day, then superglued the sides onto the bare metal of the knife. The super glue I used was the gel kind, not the liquid kind. The gel kind will fill gaps and is more forgiving when the two mating parts are not perfect fits.
Here is the result. A successful project, and it wasn't too hard. I did make a mistake on the side you're not seeing which caused a tiny hole to appear as I was doing my final sanding and shaping. I can live with that, though, because I wasn't creating a museum piece and the knife is working very well, hole or no hole.

---
Stay tuned for more tool restorations at The DEB Log. I have another tool on the bench, this one from my dad, and I hope to have it cleaned up and ready to go soon.
Also, Halloween is coming, and I've been putting some thought into my pumpkin design this year. The UM fans around the neighborhood are tired of seeing my MSU pumpkins, so I'll give them a break and move onto something different.
---
Greenfield Village in Pictures
---
Click on any of the pictures to see a larger version.
---
All you old-timer computer guys who brag about using punch cards should see the loom that used punch cards long before that...

For more info, see this page on the Jacquard loom.

K showed the Greenfield Village employee how to operate the 1917 Brown & Sharpe Turret Lathe to make a small candlestick holder.
This blurry video shows it in action. If you'd like to own one, I saw a few for sale when I was Googling around...
 After K taught the guy how to run it, I gave it a spin, so to speak. In this picture, the employee appears to have some doubts about my abilities.
 I wish I had a better picture of this machinist's chest, but I couldn't get close enough. Someday I'm going to make a scaled down version of this.
 For all you woodworkers who obsess over things "lining up" and "looking nice", this piece of shop storage is functional, and the drawers move in and out as expected. That's all you need.
 This lathe, seen here in the Village's roundhouse, is used to create parts for repair of steam locomotives. After hours, it is leased to a local matchstick factory.
 Sure, they've got a lot of wrenches, but can they change my bike tire?
 One of your larger reciprocating saws, as seen in the sawmill. This sawmill isn't operational, which is too bad, because I would really liked to have seen this in action.
---
Click on any of the pictures to see a larger version.
---
All you old-timer computer guys who brag about using punch cards should see the loom that used punch cards long before that...

For more info, see this page on the Jacquard loom.

K showed the Greenfield Village employee how to operate the 1917 Brown & Sharpe Turret Lathe to make a small candlestick holder.
This blurry video shows it in action. If you'd like to own one, I saw a few for sale when I was Googling around...


---
Subscribe to:
Posts (Atom)